
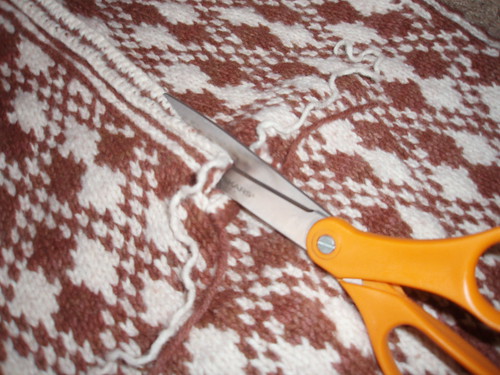
Since every steeking post has to have a scary scissors photo, I’ll get that out of the way now.
Those of you who aren’t familiar with steeking might be thinking that I must have become really angry with my sweater vest. It’s actually quite the opposite; I really love this sweater vest! And this is exactly the fate that the designer had in mind. First you spend countless hours knitting a garment, and then you cut it up!

Before steeking my vest, this is what it looked like. This bizarre lumpy-looking tube certainly doesn’t look like a garment (at least not for a human being, anyway). But there are advantages to knitting things this way. First, you knit the garment entirely in the round, so you can create a stockinette piece using just the knit stitch. I don’t have anything against purling, but when all of the stitches are knits, it’s easier to keep your stitches uniform and your knitting goes a bit quicker. Second, you are always looking at the right side of your garment. This is really helpful for colorwork projects where you spend a lot of time “reading” your knitting.
So to steek a garment, you reinforce the stitches somehow (to prevent unraveling) and then you cut through waste stitches to create things like v-necks and armholes. And then it looks like this!
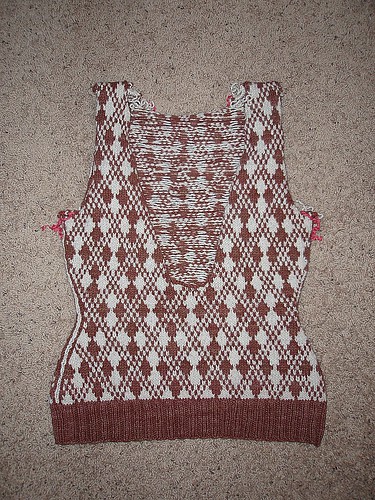
I’m too lazy to give you a more detailed tutorial on steeking, so I’ll refer you to Eunny Jang’s excellent tutorial instead. If you still think the vest looks strange, keep in mind that it’s a Deep V-Neck. The neckline is supposed to come down below the bust line, with the vest worn over a button-down shirt.
I did the crocheted steeks just like Eunny recommends in the pattern. I used a “grabby” yarn and I think the crocheted steeks looked pretty solid. I cut all of the steeks and I didn’t see any signs that they would unravel. But they still made me nervous, so I reinforced them with my sewing machine. Depending on how gung-ho I get with my finishing, I might sew them again closer to the garment and cut out some of the excess material from the steeks.
Now I just need to add some ribbing to the armholes and neckline and weave in some ends, then you’ll get to see the finished product.


I don't know how you were able to stop to take a picture - I would have been terrified! The sweater looks SO fantastic!
ReplyDelete